Prerequisites
In order to follow this guide, you need to be proficient in at least one programming language and framework. You also need to be conversant with versioning your project code with git. You’ll also need to have an account with a remote repository platform such as GitHub. I recommend you setup SSH Keys to connect with your remote repo. We’ll use a minimal Next.js project to demonstrate VS Code features. If you’re new to this, don’t worry — the focus of the guide isn’t the framework or language used. You can transfer the skills we’ll teach to any language and framework you work with in Visual Studio Code.A Bit of History
Not so long ago, these were the fully integrated development environments on offer: These platforms provide the complete development workflow, from coding to testing and deployment. They analyze code, highlight errors, and have all sorts of other features that provide assistance. They also contain plenty of features that most developers don’t use, though they are essential for some teams. As a result, these platforms took a lot of disk space and were slow to start up. Many developers preferred using advanced text editors such as emacs and vim to write their code in. Soon, a new crop of platform independent code editors arrived. These lightweight editors provided many features that were previously exclusive to IDEs. I’ve listed them below in the order they were released:- Sublime Text: July 2013
- Atom.io: June 2015
- Visual Studio Code: April 2016
Setup and Updates
Visual Studio Code’s package installer is less than 100MB and consumes less than 200MB when fully installed. When you visit the download page, it will detect your operating system and offer you the correct download link. Updating VS Code is easy. When an update is available, it displays a notification prompt. For Windows users, you’ll have to click on the notification to download and install the latest version. The download process occurs in the background while you’re working. When it’s ready to install, a restart prompt will appear. Clicking this will install the update for you and restart VS Code. For Ubuntu-based distributions, clicking on the update notification will simply open the website for you to download the latest installer. A much easier way is simply runningsudo apt update && sudo apt upgrade -y. This will update all installed Linux packages including Visual Studio Code. The reason this works is because VS Code added its repo to your package repo registry during the initial installation. You can find the repo information on this path: /etc/apt/sources.list.d/vscode.list.
User Interface
Let’s first get acquainted with the user interface: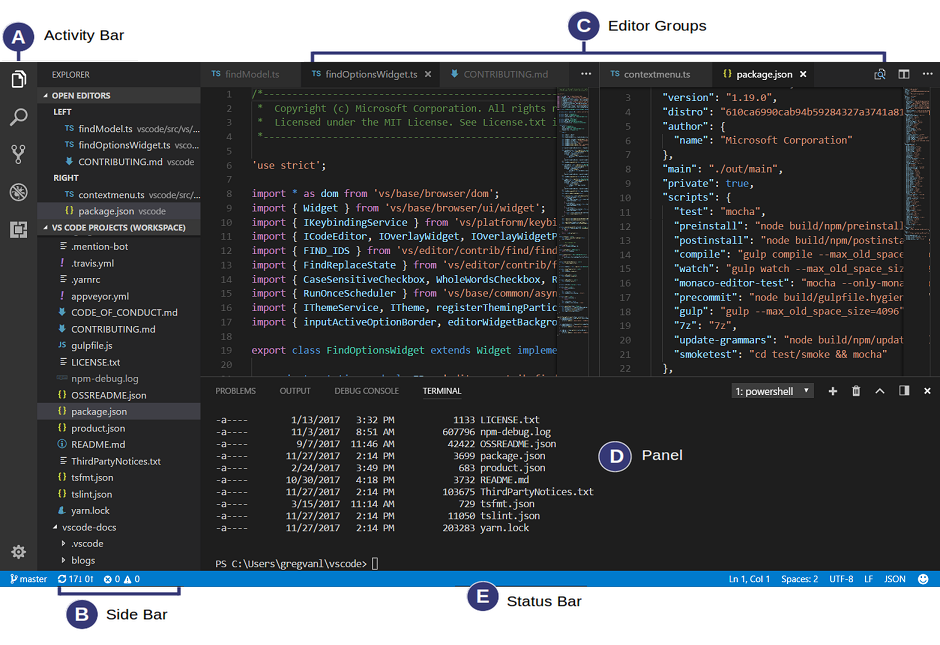
- Activity Bar: allows you to switch between views: explorer, search, version control, debug and extensions.
- Side Bar: contains the active view.
- Editor: this is where you edit files and preview markdown files. You can arrange multiple open files side-by-side.
- Panel: displays different panels: integrated terminal, output panels for debug information, errors and warnings.
- Status: displays information about the currently opened project and file. Also contains buttons for executing version control actions, and enabling/disabling extension features.
- Command Prompt
- PowerShell
- PowerShell Core
- Git Bash
- WSL Bash
Working with Projects
Unlike full IDEs, Visual Studio Code doesn’t provide project creation or offer project templates in the traditional way. It simply works with folders. On my Linux development machine, I’m using the following folder pattern to store and manage my projects:/home/{username}/Projects/{company-name}/{repo-provider}/{project-name}
Projects folder is what I refer to as to the workspace. As a freelance writer and developer, I separate projects based on which company I’m working for, and which repo I’m using. For personal projects, I store them under my own fictitious “company name”. For projects that I experiment with for learning purposes, and which I don’t intend to keep for long, I’ll just use a name such as play or tuts as a substitute for {repo-provider}.
If you’d like to create a new project and open it in VS Code, you can use the following steps. Open a terminal and execute the following commands:
$ mkdir vscode-demo
$ cd vscode-demo
# Launch Visual Studio Code
$ code .
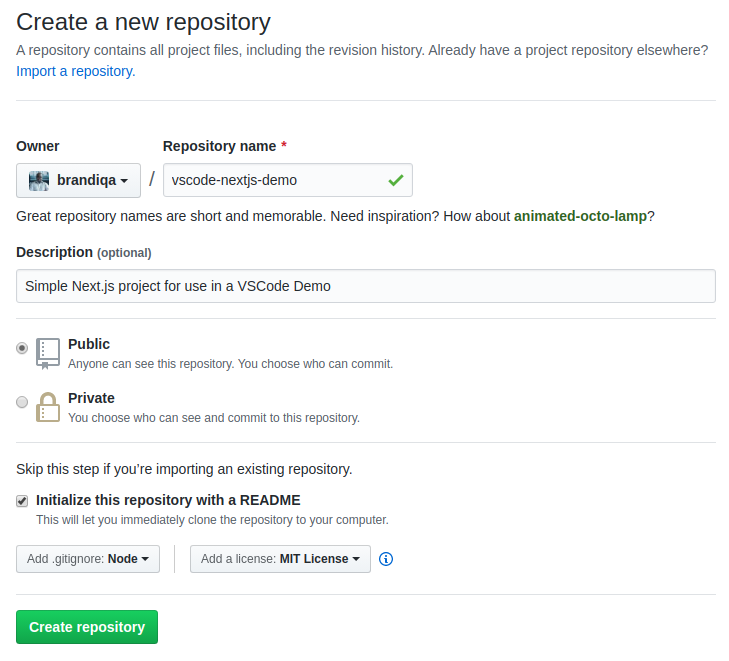 Take note of all the fields that have been filled in and selected. Next, go to the terminal and execute the following:
# Navigate to workspace/company/repo folder
$ cd Projects/sitepoint/github/

# Clone the project to your machine
$ git clone git@github.com:{insert-username-here}/vscode-nextjs-demo.git

# Open project in VS Code
$ cd vscode-nextjs-demo
$ code .
Ctrl+~ (tilde key). Use the following commands to generate package.json and install packages:
# Generate `package.json` file with default settings
$ npm init -y

# Install package dependencies
$ npm install next react react-dom
package.json and replace the scripts section with this:
"scripts": {
  "dev": "next",
  "build": "next build",
  "start": "next start"
}
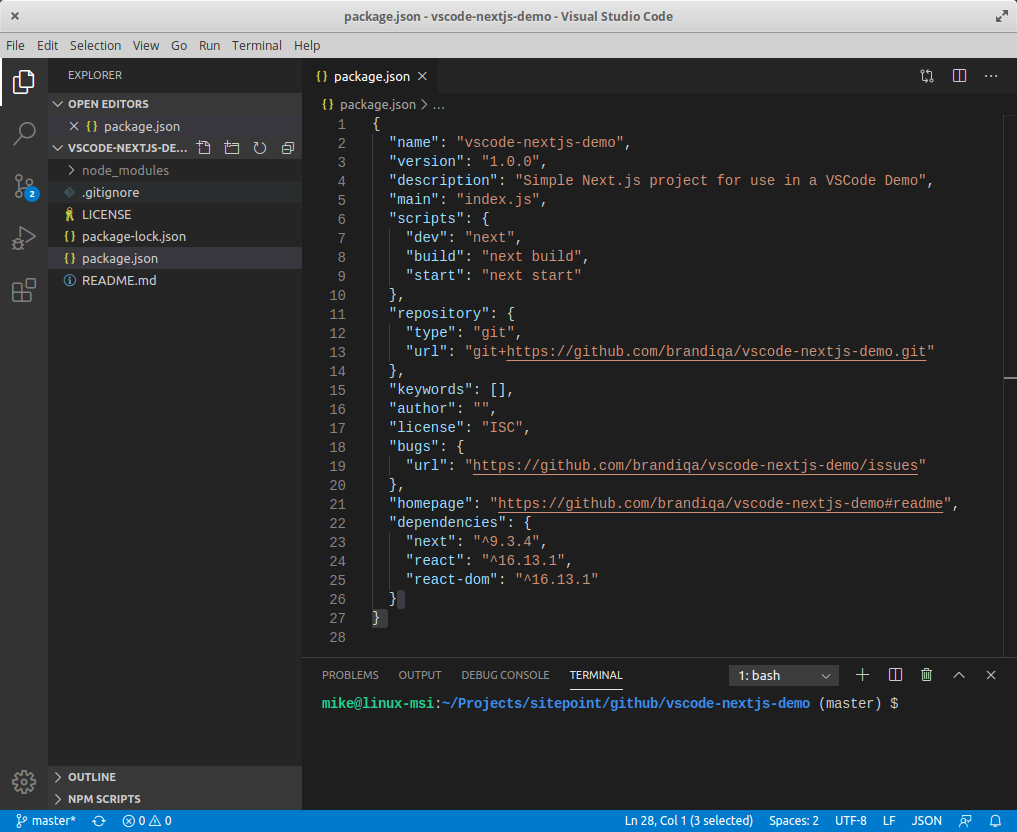 Before we look at the next section, I’d like to mention that VS Code also supports the concept of multi-root workspaces. If you’re working with related projects — front-end, back-end, docs etc. — you can manage them all in a single workspace inside one editor. This will make it easier to keep your source code and documentation in sync.
Version Control with Git
Visual Studio Code comes built-in with Git source control manager. It provides a UI interface where you can stage, commit, create new branches and switch to existing ones. Let’s commit the changes we just did in our project. On the Activity bar, open the Source Control Panel and locate the Stage All Changes plus button as shown below.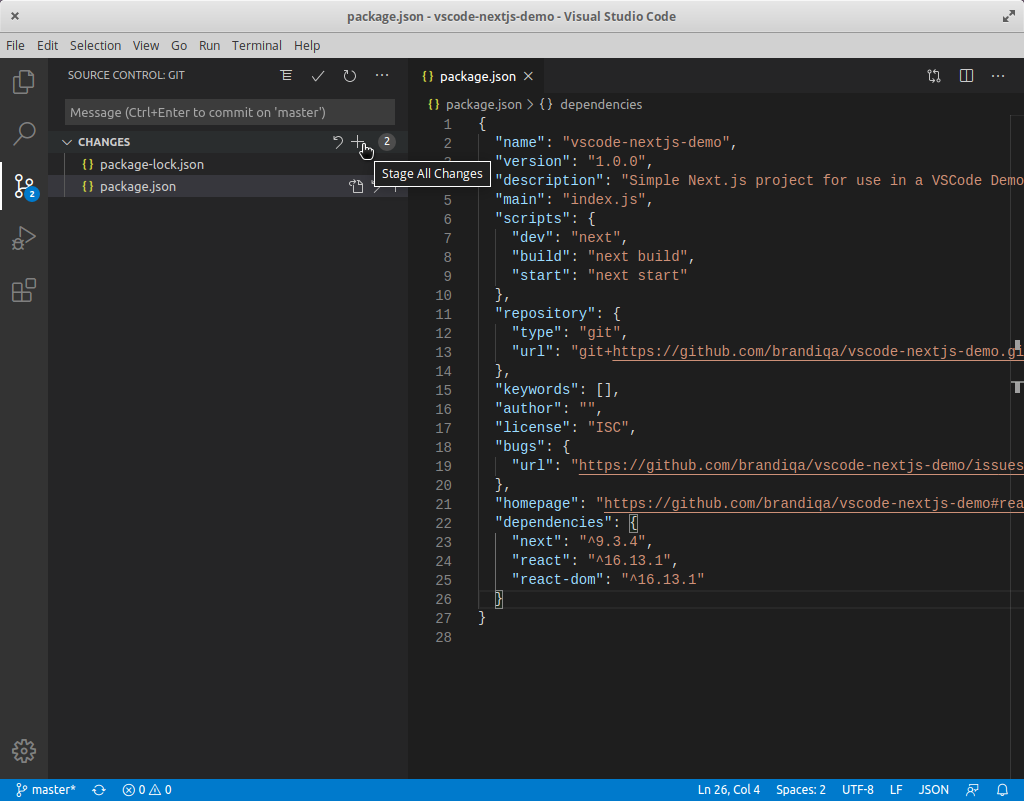 Click on it. Next, enter the commit message “Installed next.js dependencies”, then click the Commit button at the top. It has the checkmark icon. This will commit the new changes. If you look at the status located at the bottom, you’ll see various status icons at the left-hand corner. The
 0 ↓ means there’s nothing to pull from the remote repo. The 1 ↑ means you’ve got one commit you need to push to your remote repo. Clicking on it will display a prompt on the action that will take place. Click OK to pull and push your code. This should sync up your local repo with the remote repo.
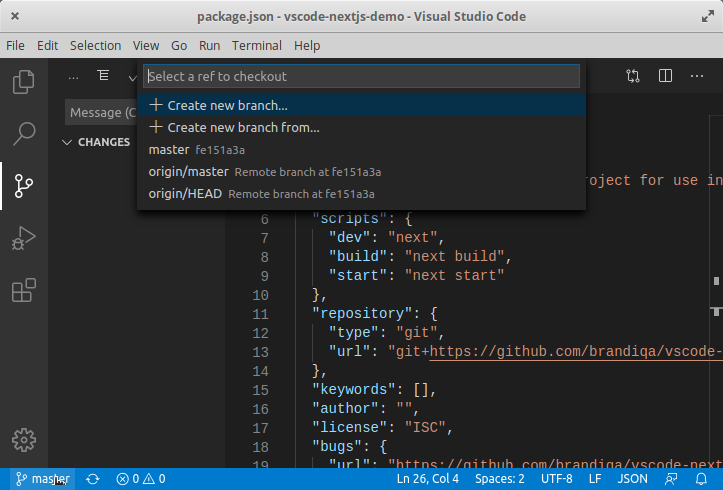
To create a new branch or switch to an existing branch, just click the branch name master on the status bar, left bottom corner. This will pop up a branch panel for you to take an action.
 Do check out the following extensions for an even better experience with Git:
Support for a different type of SCM, such as SVN, can be added via installing the relevant SCM extension from the marketplace.
Creating and Running Code
On the Activity Bar, head back to the Explorer Panel and use the New Folder button to create the folderpages at the root of the project. Select this folder and use the New File button to create the file pages/index.js. Copy the following code:
function HomePage() {
  return <div>Welcome to Next.js!</div>;
}

export default HomePage;
dev. A run button (play icon) will appear next to it. Click on it and this will launch a Next.js dev server inside the Integrated Terminal.
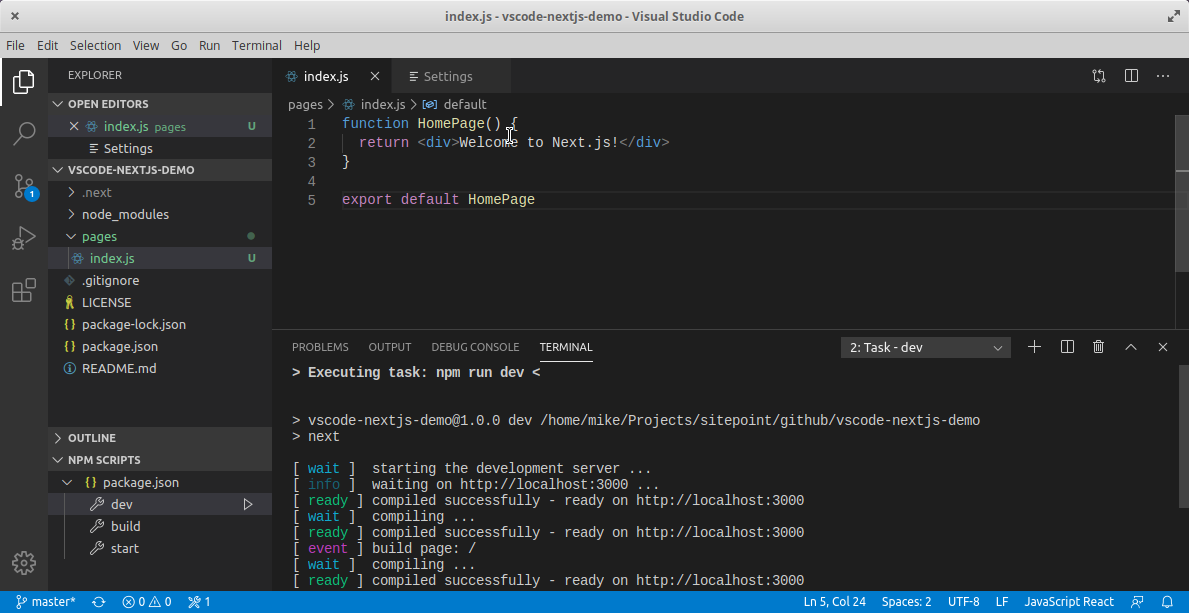 It should take a few seconds to spin up. Use Ctrl + Click on the URL
 http://localhost:3000 to open it in your browser. The page should open successfully displaying the “Welcome” message. In the next section, we’ll look at how we can change Visual Studio Code preferences.
User and Workspace Settings
To access VS Code preference settings, use the shortcut key Ctrl + ,. You can also access it via the menu command like this:- On Windows/Linux – File > Preferences > Settings
- On macOS – Code > Preferences > Settings
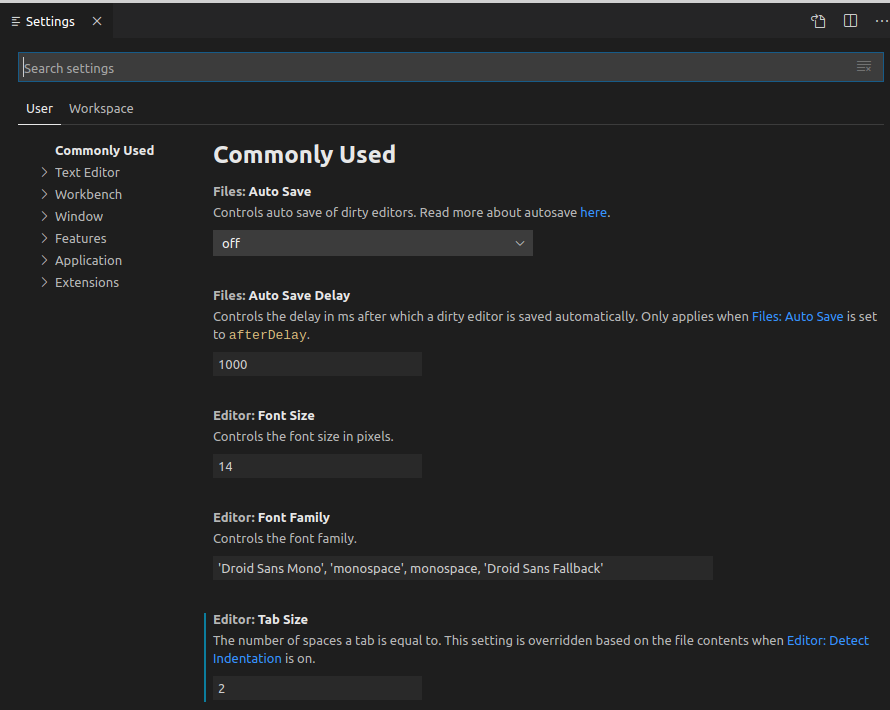 When changing settings using the editor, pay attention to the active scope at the top. Take note that not all settings can be configured via the graphical interface. For that, you have to edit the file
 settings.json directly. As you scroll down the Settings editor, you’ll come across a shortcut that will take you to this file.
There are two different scopes that Visual Studio Code settings are classified under:
- User Settings: Settings are stored under user account. They will take effect on all projects your work on.
- Workspace: Settings are stored within project or workspace folder. They will apply only in that specific project.
- Windows:
%APPDATA%\Code\User\settings.json - macOS:
$HOME/Library/Application Support/Code/User/settings.json - Linux:
$HOME/.config/Code/User/settings.json
.vscode at the root of your project. Then create the file settings.json inside this folder. If working with the Settings editor panel, it will do this for you automatically when you change settings under the Workspace scope. Here’s a subset of the global settings I prefer to work with:
{
  "editor.minimap.enabled": false,
  "window.openFoldersInNewWindow": "on",
  "diffEditor.ignoreTrimWhitespace": false,
  "files.trimTrailingWhitespace": true,
  "javascript.updateImportsOnFileMove.enabled": "always",
  "workbench.editor.enablePreview": false,
  "workbench.list.openMode": "doubleClick",
  "window.openFilesInNewWindow": "default",
  "editor.formatOnPaste": true,
  "editor.defaultFormatter": "esbenp.prettierVS Code",
  "editor.formatOnSave": true,
  "editor.tabSize": 2,
  "explorer.confirmDelete": false
}
window.openFoldersInNewWindow allows me to open new project folders without closing (replacing) the active one. For editor.defaultFormatter, I’ve set it to Prettier, which is an extension I have installed. We’ll discuss this in a later section shortly. Next, let’s look at language associations.
Language Association
I do a lot of projects using React. Lately, most React frameworks generate components use the.js extension instead of .jsx. As a result, formatting and syntax colorization becomes a problem when you start writing JSX code. To fix this, you need to associate .js files with JavaScriptReact. You can easily do this by changing Language Mode via the Ctrl + Shift + P command panel. You can also update settings.json by adding this configuration:
{
  "files.associations": {
    "*.js": "javascriptreact"
  }
}
settings.json:
{
  "emmet.includeLanguages": {
    "javascript": "javascriptreact"
  }
}
emmet.includeLanguages. For more information, check out the official documentation for VS Code Emmet.
Keyboard Shortcuts
So far, we’ve covered two keyboard shortcuts:- Ctrl + ,: Open settings
- Ctrl + Shift + P: Open command palette
{
  "editor.defaultFormatter": "esbenp.prettierVS Code"
}
- Ctrl + P will let you navigate to any file or symbol by typing its name
- Ctrl + Tab will cycle you through the last set of files opened
- Ctrl + Shift + O will let you navigate to a specific symbol in a file
- Ctrl + G will let you navigate to a specific line in a file
- Ctrl + D: press multiple times to select identical keywords. When you start typing, it renames all the selected keywords
- Ctrl + Shift + Up/Down: Add Cursor above or below in order to edit multiple lines at once
- Alt + Shift + Click: Add Cursor at multiple locations in order to edit in different sections of code simultaneously
- Ctrl + J: Add 2 or more lines into one. Works perfectly if you’ve a formatter active as you edit code
- Ctrl + F: Search for a keyword in current file
- Ctrl + H: Search and replace in current file
- Ctrl + Shift + F: Search in all files
Code Editor Features
In this section, we’ll quickly look into the various developer-friendly features Visual Studio Code provides to help you write faster, cleaner and more maintainable code.Intellisense
This is a popular feature also known as “code completion” or autocomplete. Out of the box, VS Code provides Intellisense for:- JavaScript, TypeScript
- HTML
- CSS, SCSS and Less
. at the end of a keyword or pressing Ctrl + space bar will trigger the IntelliSense popup to appear.
If you’re working with a language that is not supported out of the box, you can install a language extension from the marketplace to activate IntelliSense for your desired programming language. Check out the official docs to learn more on how you can customize IntelliSense.
Snippets
Typing repetitive code such asif statements, for loops and component declaration can be a bit tiring. You might find yourself copying and pasting code to work faster. Fortunately, Visual Studio Code offers a feature called Snippets, which are simply templates of code. For example, instead of typing console.log, just type log and IntelliSense will prompt to insert the snippet for you.
There are many snippets you can access as long as you’ve memorized the shorthand or keyword that triggers snippet insertion. Since you’re new to this, you can access a list of all snippets available via Command Palette > Insert Snippets:
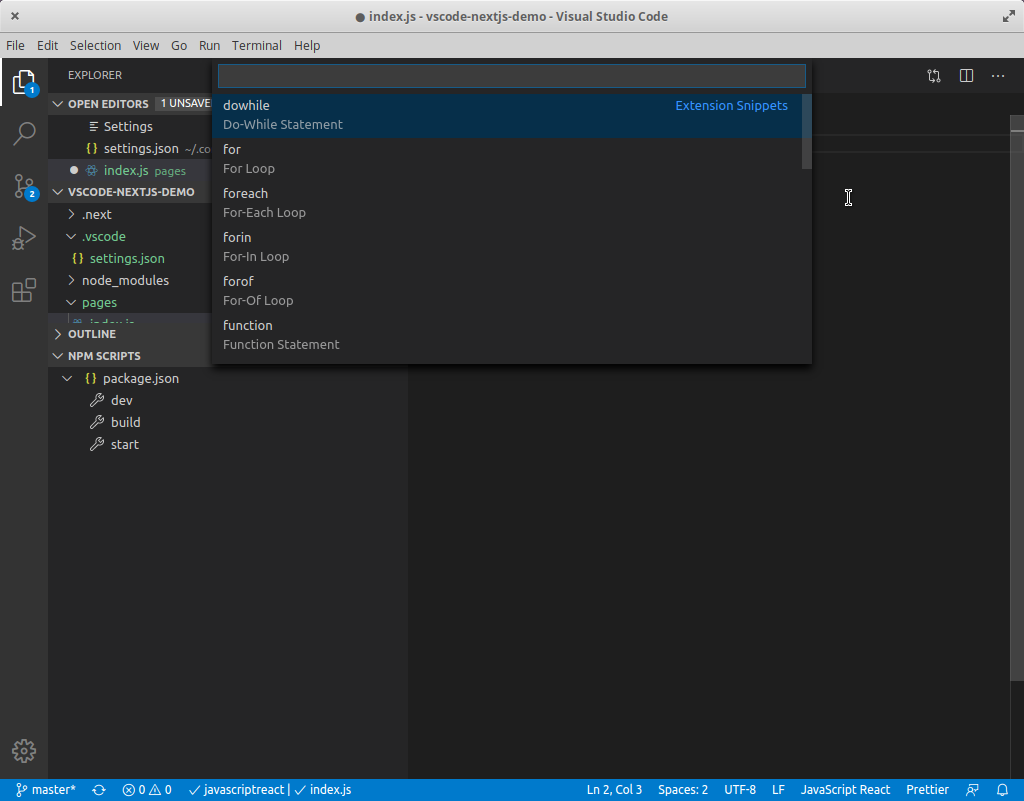 Scroll up and down to view the entire list. Take note that most snippets have tabstops that allow you to replace the relevant sections of code when you insert them. You can find more snippet extensions in the marketplace. You can also create your own. This article shows you how to do both. You can check out the official docs for more information on how to define your own snippets.
Formatting
Often when typing or pasting code from different sources, we tend to mix coding styles. For example:- indenting with space vs tabs
- ending with semicolon
- double quotes or single quotes
- JavaScript
- TypeScript
- JSON
- HTML
true or false:
editor.formatOnType: format the line after typingeditor.formatOnSave: format a file on saveeditor.formatOnPaste: format the pasted content
"html.format.enable": false
- Flow · JSX · JSON
- CSS · SCSS · Less
- Vue · Angular
- GraphQL · Markdown · YAML
{
  "editor.defaultFormatter": "esbenp.prettierVS Code",
  "": {
    "editor.defaultFormatter": "esbenp.prettierVS Code"
  }
}
prettier package locally as a dev dependency:
npm install prettier -D --save-exact
.prettierrc configuration file either at the root of your project or in your home directory. You can place your custom formatting rules here. Here’s an example:
{
  "trailingComma": "all",
  "tabWidth": 2,
  "semi": false,
  "singleQuote": true
}
Linting
A Lint, or Linter is a tool that analyzes your code and checks for syntax errors, styling issues, calls to undeclared variables, usage of deprecated functions, misuse of scope and many other issues. Visual Studio Code doesn’t come shipped in with any Linter. However, it does make it easy setting up one for the programming language you’re using. For example, if you’re working on new Python project, you’ll get a prompt to install one for you. You can also open the Command Palette (Ctrl + Shift + P) and select the Python: Select Linter command. For JavaScript, you’ll need to install an extension such as ESLint which is the most popular. This extension requires you to install ESLint as a dev dependency. You may also need one or more ESLint plugins that will help you lint the coding style and framework you’re using. You can check out our guide on how to configure ESLint. There are also other linter tools you can check out. My recommendation is to go with ESLint as it’s easier to configure and supports more JavaScript styles and frameworks. Once you’ve set up the linting tool, VS Code will automatically lint your code every time you save the file. You should also update yourpackage.json scripts to include a command for running the lint tool.
Debugging
If you use print statements to debug, you should cease and desist as there’s a better way to debug your code. With VS Code, you can set breakpoints and inspect variables while your code is running.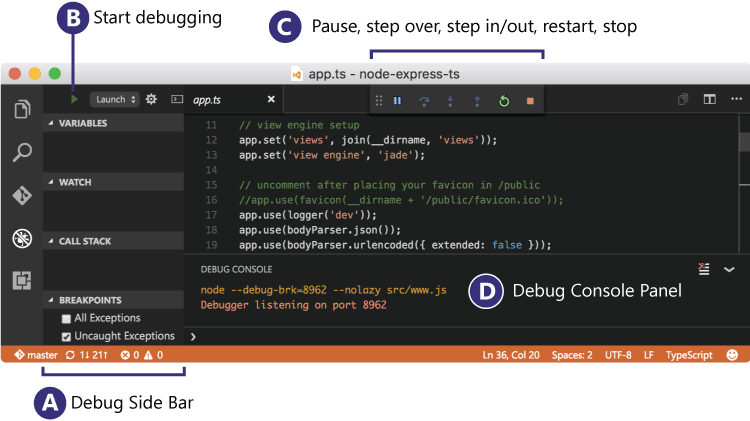
Summary
We’ve now come to the end of the guide. As noted earlier, the information here will help you jump start your way into improving your coding workflow with Visual Studio Code. I recommend you check out our top 10 must-have extensions for VS Code. While most VS Code tools are easy to learn and integrate into your workflow, others need some time to figure out and get used to. Nevertheless, mastering VS Code features will make you an efficient and better software developer. If you want to reach the absolute peak of productive performance with Visual Studio Code, check out Visual Studio Code: End-to-End Editing and Debugging Tools for Web Developers. It’s a fantastic book from Wiley that you can read online (or off!) in our Premium library.Frequently Asked Questions (FAQs) about Visual Studio Code Power User Guide
How can I customize the Visual Studio Code interface to suit my preferences?
Visual Studio Code offers a highly customizable interface. You can adjust the theme, icon themes, and even the color scheme of your coding environment. To change the theme, go to File > Preferences > Color Theme and select the theme you prefer. For icon themes, go to File > Preferences > File Icon Theme. You can also customize the color scheme by creating a .json file in the .vscode directory.
How can I use Visual Studio Code for debugging?
Visual Studio Code has a built-in debugger that makes it easy to debug your code. To start debugging, click on the bug icon on the left sidebar, then click on the green play button. You can set breakpoints, step through your code, inspect variables, and view the call stack. You can also customize your debugging configuration by editing the launch.json file.
What are some useful keyboard shortcuts in Visual Studio Code?
Visual Studio Code has many keyboard shortcuts that can help you code more efficiently. Some of the most useful ones include Ctrl + P to quickly open files, Ctrl + Shift + F to search across all files, and Ctrl + ` to open the integrated terminal. You can view a full list of keyboard shortcuts by going to File > Preferences > Keyboard Shortcuts.
How can I use extensions in Visual Studio Code?
Extensions can greatly enhance your coding experience in Visual Studio Code. To install an extension, click on the Extensions icon on the left sidebar, search for the extension you want, and click Install. You can manage your installed extensions by clicking on the … button in the Extensions view.
How can I use the integrated terminal in Visual Studio Code?
The integrated terminal in Visual Studio Code allows you to run command line commands directly from the editor. To open the terminal, go to View > Terminal or press Ctrl + `. You can create multiple terminal instances, switch between them, and even split them into multiple views.
How can I use Git in Visual Studio Code?
Visual Studio Code has built-in support for Git. To use Git, click on the Source Control icon on the left sidebar. You can stage changes, commit them, create branches, merge branches, and perform other Git operations. You can also view the diff of a file by clicking on the file in the Source Control view.
How can I customize the settings in Visual Studio Code?
You can customize the settings in Visual Studio Code by going to File > Preferences > Settings. The settings are stored in a .json file, which you can edit directly. You can also search for specific settings using the search bar at the top of the Settings view.
How can I use snippets in Visual Studio Code?
Snippets are pieces of reusable code that you can insert into your code with a few keystrokes. To use a snippet, type the prefix of the snippet and press Tab. You can create your own snippets by going to File > Preferences > User Snippets.
How can I use the multi-cursor feature in Visual Studio Code?
The multi-cursor feature allows you to edit multiple lines of code at once. To use multi-cursor, hold down Alt and click where you want to add a cursor. You can also select a block of text and press Shift + Alt + I to insert a cursor at the end of each line.
How can I use the Find and Replace feature in Visual Studio Code?
The Find and Replace feature allows you to quickly find and replace text in your code. To use Find and Replace, press Ctrl + F to open the Find widget, type the text you want to find, then press Enter. To replace text, press Ctrl + H to open the Replace widget, type the text you want to replace, then press Enter.
I write clean, readable and modular code. I love learning new technologies that bring efficiencies and increased productivity to my workflow.


