“Can you give it a little more… I don’t know… pizazz?” Heard this before? How often does a client walk in, see a Website composition, and though they like what they see, they feel that it needs a little more? And how often have you heard the question “Can you make it interactive?”
Of course, by their nature, Websites are interactive. But the golden nugget that clients look for is something that shows that their Website – and therefore, their comany – leverages the latest technologies. The trick is to provide your customers with a little pizazz and guarantee that, whatever the Web browser, your tricks will work.
Macromedia Fireworks comes armed with a full arsenal of tools that allows for rich interaction, and lets you take clients beyond the design. First, you just have to learn a few rules of engagement, and then it’s off to battle with a killer design and fully interactive site.
Rules of Engagement
The most common method used to add interactivity to a Website is to employ JavaScript. JavaScript is a programming language supported by the main Web browsers that allows events – such as image swapping, a status bar message or a pop-up menu – to occur. And Fireworks lets you avoid learning Javascript. Fireworks contains a set of useful JavaScript commands in the Behaviors Inspector, as shown in figure 1. Behaviors are pre-programmed pieces of JavaScript code that can be easily modified. If you’ve used Dreamweaver, you’ll recognize the Behavior Inspector – and it works and behaves the same way in both programs. Indeed, any Behavior added in Fireworks can be modified in Dreamweaver, with the exception of the Popup Menu behavior.
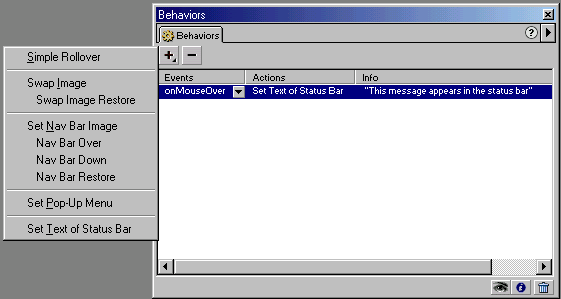
Figure 1. The Behavior Inspector
The Behavior Inspector quickly adds the correct JavaScript to an image. And only one rule applies: a Behavior can only be added to a hotspot or slice on an image. A hotspot or slice can be created using the Hotspot tool or Slice tool, as shown in figure 2. Select the tool and draw on the image you have created in Fireworks. The text in figure 2 is traced with the Hotspot tool.
![]()
Figure 2. The Hotspot Tool
The Hotspot tool is used to draw a region around the graphic, so that a behavior can be applied to this new region.
The Slice tool allows you to cut up a section of a graphic. When you export the graphic, it’ll be exported as a Web page with a collection of images. If you select the Web page and open it inside a Web browser, it will appear as a whole image. Actually, the page is a HTML Table with several images arranged together. The slicing tool can be seen in figure 3.

Figure 3. The Slice Tool
The Slice tool provides a richer selection of JavaScript interactions, and has an advantage over the Hotspot tool in that it allows images to be swapped. More on this trick later.
The First Behavior
The first behavior is going to be a simple Status Bar message. In active mode, the Status Bar behavior will place a message in the status bar of your Web browser when a user moves their cursor over a section of the graphic.
Take, for example, the hypothetical GarageSale.com Website. The title of the site is GarageSale.com, and we’ll attach the Status Bar behavior to the site’s logo. If we right click on the Garagesale.com logo, we’re presented with a quick set of menu options. Click on “insert HotSpot”. A blue outline appears around the title to indicate that a Hotspot has been associated with the graphic. Next, open the Behaviors Inspector, as shown in figure 4.
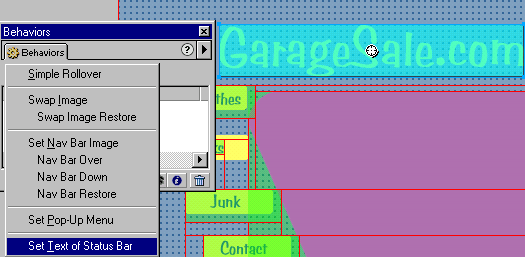
Figure 4. The Behaviours Inspector
The Behaviors Inspector has five main behaviors. Here the “Set Text of Status Bar” is being selected.
From the Behaviors Inspector, select the “+” symbol and choose “Set Text of Status Bar”. A pop-up window will ask you to add a one line phrase – let’s enter “Got Junk? Come sell it here!”, as shown in figure 5.

Figure 5. The Set Text of Status Bar behavior is a commonly used JavaScript.
Select “OK” to close the window. The Behavior Inspector now lists the “Set Text of Status Bar”. The action will only show on the Behaviors Inspector when the Hotspot that surrounds the title is selected. This allows you to group Behaviors together. The Behaviors Inspector is divided into two sections, Events and Actions, as you can see in figure 6.
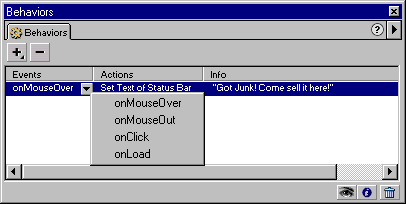
Figure 6. The Events and Actions allow you to customize the effect beyond “canned” scripts.
The Action defines what will happen. In this case, the Action is “Set Text of Status Bar”. The Event is what will cause the action to happen. The default for most Behaviors is “onMouseOver”, that is, when the cursor moves over the appropriate section of the graphic, the action will be activated. The other Events include:
- onMouseOut
- onClick
- onLoad
The Event “onMouseOut” will cause the action to occur as the cursor is leaving the image. For instance, the appearance of a rollover button will change as the mouse moves in and out of the space of the button graphic. “onClick” will only trigger the action when a user clicks on the graphic. Finally, the “onLoad” Event executes as the user’s browser loads the Web page.
All these actions use JavaScript to produce the effect in the Web page. You can rest assured that the scripts will work in Netscape’s Navigator 3 and Microsoft’s Internet Explorer 3 and up (the Set Text of Status Bar Behavior will work in Netscape 2.02+).
The next step is to preview your work in a Web browser – open your browser and load up the page. Figure 7 shows how the status bar for the browser will change as you move the cursor over the title of the page.
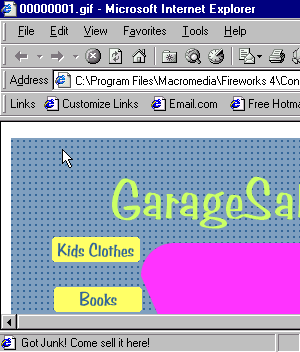
Figure 7. The Web browser’s status bar now reads “Got Junk? Come sell it here!”
Image Swapping
The second most commonly used Behavior is “Image Swapping” – millions of Websites have buttons whos appearance changes as the cursor moves over them.
The Behavior that creates this effect is called a “Simple Rollover”. For this Behavior to work, the image to which the Simple Rollover is attached must be a “sliced image”, and the graphic must be at least two frames long.
The GarageSale.com site uses buttons for its navigation. As a user moves over the nav bar, each button is modified with a drop shadow. To create this effect, you’ll need two frames, so add a second frame in the Frames Inspector. Select the second frame, and your canvas will go blank. To keep the background color consistent across the entire movie, place the background objects in their own layer. Rename the new layer “Background” and select the option “Share Across Frames”. This is particularly important, as the buttons for the GarageSale.com site have transparent background. If the background is not consistent across all frames, the roll over images will have a white background, which will dispell the illusion of the rollover effect.
Now that the background is consistent on all sites, select the layer that contains the buttons – this will also select each button’s text. Select Edit, then Copy, to place the images into memory. Next, select Frame 2. Click on Edit, then Paste, to insert the buttons with text into exactly the same place as the objects in Frame 1. But these are now different objects. Select the first button and add a drop shadow live effect to it, then repeat the procedure for the remaining buttons.
The graphical changes have been made. Now the effect must be added. To create a “Simple Rollover” effect, a slice must be added to each button. Select the buttons in Frame 2 and insert a slice with the right click menu option “Insert Slice”. Then, select the first button, and, with the Behaviors Inspector open, insert a “Simple Rollover” as shown in figure 8. Note that if you create the slices on frame 1, they won’t be large enough to cover the drop shadows. you should select the buttons on frame 2 and then choose “Insert Slice”.
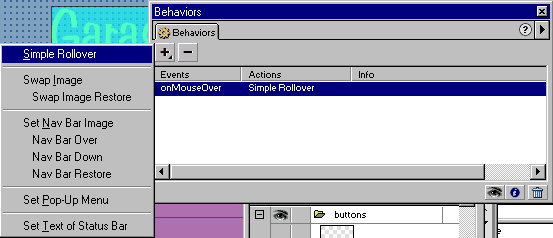
Figure 8. The Behaviors Inspector replaces Frame 1 images with Frame 2 images when the Simple Rollover is inserted.
Press F12 to preview the file in your Web browser. The effect works by replacing the image in Frame 1 with the corresponding image in Frame 2. A second Behavior replaces the original image onMouseOut.
New For Fireworks 4
Fireworks 4 users will find that an easy way to insert Behaviors onto a Slice or Hotspot is to select the target in the center of the graphic. Figure 9 demonstrates the target that provides direct access to the Behaviors.

Figure 9. Fireworks 4 has made it very easy to access Behaviors without opening the Behaviors Inspector.
Advanced Image Swapping
An Advanced version of the Simple Rollover Behavior is the “Swap Image Behavior”. Essentially, the Swap Image Behavior accomplishes the same end result as the Simple Rollover – that is, when an image is selected by the cursor it’s replaced by another image. The strength of Swap Image is that it allows you to swap multiple images at once. For instance, the buttons used for the GrarageSale.com navigation have a Simple Rollover applied to them. In addition, as the cursor rolls over each button, the text in the center of the site changes. The Swap Image Behavior makes this poosible.
Select a button and apply the Swap Image Behavior. A Swap Image Behavior, as shown in figure 10, has a number of enhanced features.
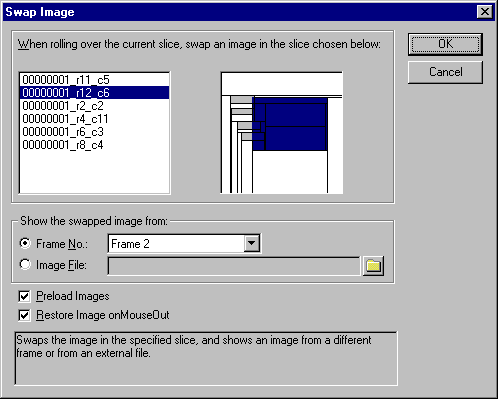
Figure 10. The Swap Image affords the designer great control over which images are changed.
The Swap Image window, which appears along the top half of the window, shows the name and the location of the image on the canvas. The name in the left hand column can be changed in the Object Inspector. Alternatively, you can select the image that is to be changed from the right hand view of the canvas.
All the Sliced regions of the graphic appear in the right hand frame. Select the text in the center of the canvas. Now we have to replace the image in this slice with another image. To do this, simply choose a frame number. The effect is the same as a Simple Rollover, with the exception that you can select any frame to replace the current frame. For instance, each button can have the same behavior associated with it, and the text in the center of the canvas can be changed to a different frame number with different text.
Exporting For the Web
For all of this to work correctly, you’ll need to export the file in a Web format. Fireworks adjusts the file format to HTML when you select File, Export. Figure 11 demonstrates how this works.
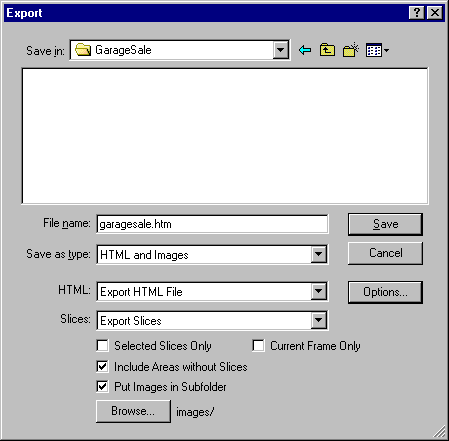
Figure 11. The Save Type is HTML and Images.
The file type must be selected as HTML and Images with Slices set to “Export Slices”. The exported file will be comprised of a number of graphic files and a Web page, which can now be sent to your Website. And the Behaviors you added in Fireworks can be modified in Dreamweaver.
With Fireworks you can now deliver Web pages that leave customers saying “Wow! That’s PIZAZZ!”
Frequently Asked Questions about JavaScript Fireworks
How can I add more colors to my JavaScript fireworks?
Adding more colors to your JavaScript fireworks can make them more visually appealing. In the JavaScript code, you can find an array of colors. By default, you might find basic colors like red, green, and blue. You can add more colors by adding their RGB values to this array. For example, to add yellow, you would add ‘rgb(255,255,0)’ to the array.
Can I control the speed of the fireworks?
Yes, you can control the speed of the fireworks by adjusting the velocity parameters in the JavaScript code. The velocity parameters determine how fast the particles move. By increasing these values, the particles will move faster, creating the effect of faster fireworks.
How can I make the fireworks explode in different shapes?
The shape of the explosion is determined by the algorithm that calculates the trajectory of the particles. By default, the particles are spread out in a circular pattern to create a spherical explosion. If you want to create different shapes, you would need to modify this algorithm. This might require advanced knowledge of mathematics and physics.
Can I add sound effects to the fireworks?
Yes, you can add sound effects to the fireworks by using the HTML5 audio API. You would need to load a sound file and play it whenever a firework explodes. This can add an extra layer of realism to your fireworks display.
How can I make the fireworks display responsive?
To make the fireworks display responsive, you would need to adjust the canvas size based on the window size. You can do this by adding an event listener for the window resize event and updating the canvas size accordingly. This will ensure that the fireworks display looks good on all screen sizes.
Can I use JavaScript fireworks in a commercial project?
Yes, you can use JavaScript fireworks in a commercial project. However, you should check the license of the library you are using to make sure that commercial use is allowed. Some libraries might require you to give credit to the author or pay a license fee for commercial use.
How can I optimize the performance of the fireworks display?
There are several ways to optimize the performance of the fireworks display. One way is to limit the number of particles that are created. Another way is to use a more efficient algorithm for calculating the particle trajectories. You could also use a web worker to offload some of the computation to a separate thread.
Can I use JavaScript fireworks in a mobile app?
Yes, you can use JavaScript fireworks in a mobile app. However, you should be aware that the performance might not be as good as on a desktop computer. Mobile devices have less processing power and might struggle to handle a large number of particles.
How can I add interactivity to the fireworks display?
You can add interactivity to the fireworks display by adding event listeners for user input. For example, you could allow the user to click or tap to launch a firework. This can make the fireworks display more engaging and fun to use.
Can I use JavaScript fireworks with other JavaScript libraries?
Yes, you can use JavaScript fireworks with other JavaScript libraries. You can use any library that works with the HTML5 canvas API. This includes popular libraries like jQuery, React, and Angular. However, you should be aware that some libraries might not be compatible with the fireworks library you are using.
Matthew’s most recent publications include Flash MX Magic (New Riders), Flash MX Game Design f/x & Design (Coriolis) and content for Everything Ever Needed to Know about Live Motion 2.0, Flash 5 Magic, Inside Dreamweaver 4, Flash 5: Visual FX, Web Publishing Bible and The Dreamweaver Bible.
