I spent the week tinkering with a Raspberry Pi Camera and exploring ways to get it to stream images to a web browser. In this article, we’ll explore the simplest and most effective way I found to stream images into client side JavaScript. In the end, we’ll stream those images into the Virtual Reality viewer built in my earlier article on Filtering Reality with JavaScript and Google Cardboard.
What You’ll Need
For this demo, you’ll currently need a Raspberry Pi (I used the Raspberry Pi 2 Model B) with Raspbian installed (NOOBS has you covered here), an Internet connection for it (I recommend getting a Wi-Fi adaptor so your Pi can be relatively portable) and a Camera module.
If your Pi is brand new and not currently set up, follow the instructions on the Raspberry Pi NOOBS setup page to get your Pi ready to go.
If you’ve got a bunch of stuff on your Pi already, please make sure you back everything up as the installation process replaces various files. Hopefully everything should play nicely but it’s always important to be on the safe side!
The Code
Our demo code that uses the camera data is accessible on GitHub for those eager to download and have a go.
Attaching Your Pi Camera
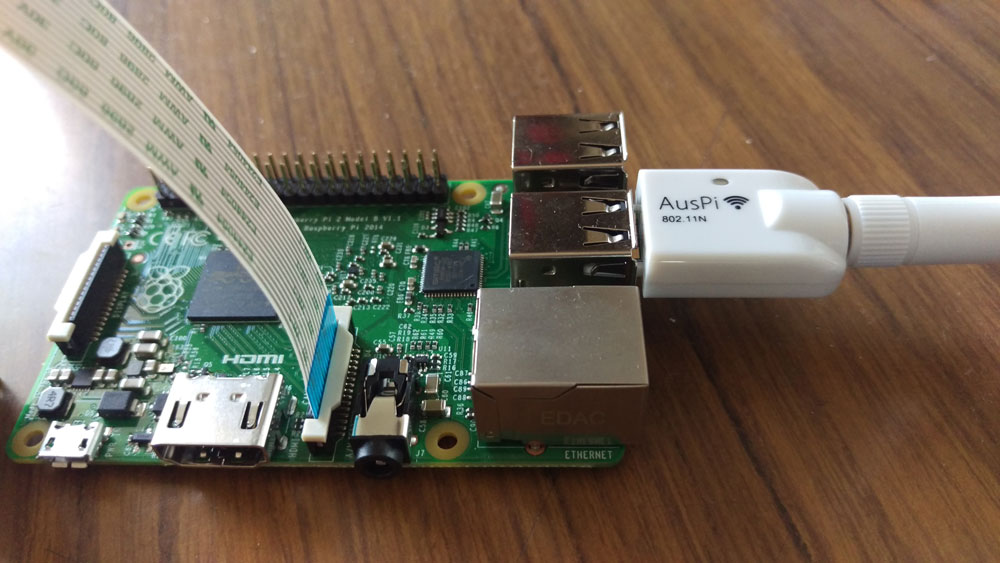
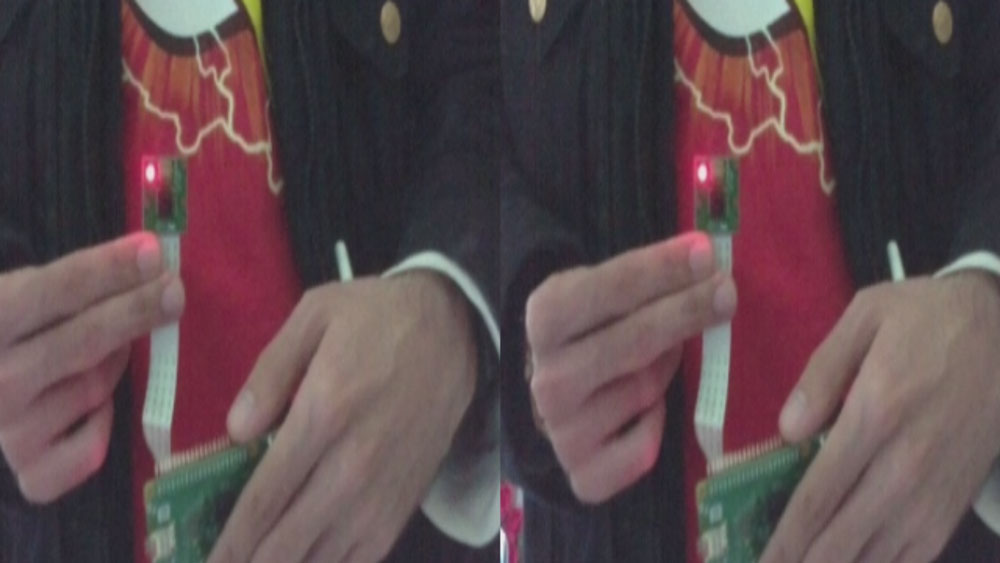
If you are new to the Raspberry Pi and attaching a camera, I’ll cover it quickly here. Basically, there is a plastic container (called the flex cable connector) around the opening which you’ll want to gently open. To do so, pull the tabs on the top of the connector upwards and towards the Ethernet port. Once you’ve got it loosened, you’ll be able to slot in your camera’s flex cable. The cable has a blue strip on it on one side, connect it so that side is facing the ethernet port. Be careful to keep the cable straight (don’t place it into the slot at an angle, it should fit straight in). Here’s a photo of my camera flex cable connected correctly to show what we’re looking for here:
RPi Cam Web Interface
The easiest way I’ve found to stream images from the Pi camera was to use the RPi Cam Web Interface. You run a few basic terminal commands to install it and then it sets up your camera on an Apache server ready to use.
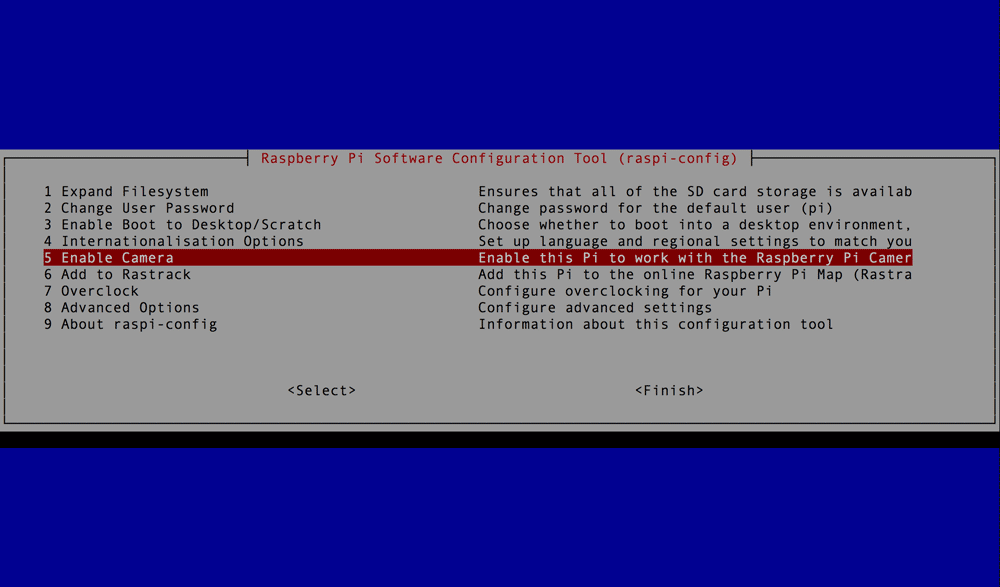
If you’ve installed Raspbian from scratch already, you may have also already enabled the camera in the config screen that appeared afterwards. If not, you can get to it by typing in the following command:
sudo raspi-configOn that screen, you’ll be able to select “Enable Camera”, click that option and and choose “Enable” from the screen that appears.
Next up, make sure your Raspberry Pi is up to date (before doing this, I want to reiterate – back things up to be safe). We start by downloading the latest repository package lists:
sudo apt-get updateWe then make any updates to existing repositories on our Pi that we might have found:
sudo apt-get dist-upgradeFinally, we update our Raspberry Pi software itself too:
sudo rpi-updateThen, we install the RPi Cam Web Interface itself from its GitHub repo. Go to the location on your Pi that you’d like to clone the repo to and run the git clone command:
git clone https://github.com/silvanmelchior/RPi_Cam_Web_Interface.gitThis will create a RPi_Cam_Web_Interface folder ready with a bash installer. Firstly, go to that directory:
cd RPi_Cam_Web_InterfaceUpdate the permissions on the bash file so you can run it:
chmod u+x RPi_Cam_Web_Interface_Installer.shThen run the bash install program:
./RPi_Cam_Web_Interface_Installer.sh installThe install program has slightly more of a visual interface. I personally installed it via the Apache server option (the first option), so the following will all focus on that method. If you prefer to use an Nginx server, you can. I’d imagine much of the process is relatively similar though.
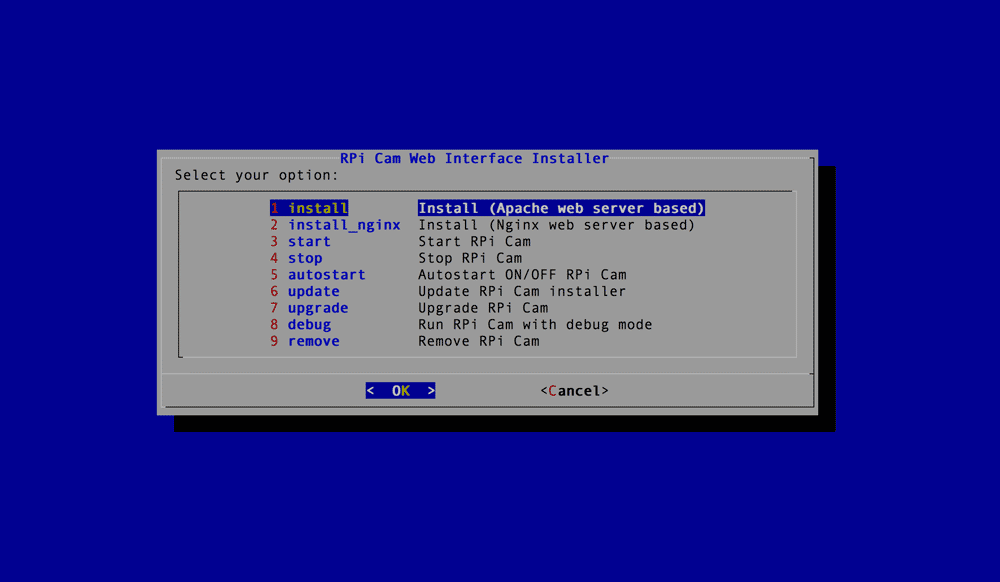
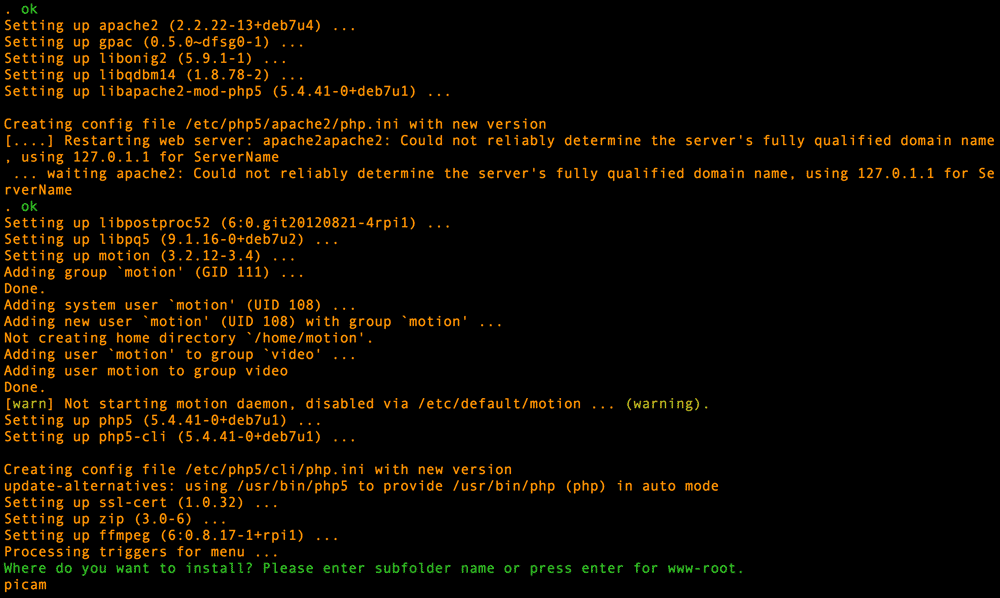
You’ll then specify where you’d like to place the RPi Cam Web Interface on your server’s /var/www directory. If you don’t list anything, it will install in the root /var/www folder. I installed it in a folder called picam to keep it separate.
On the next screen, I selected “yes” to whether I wanted the camera to auto start on boot time.
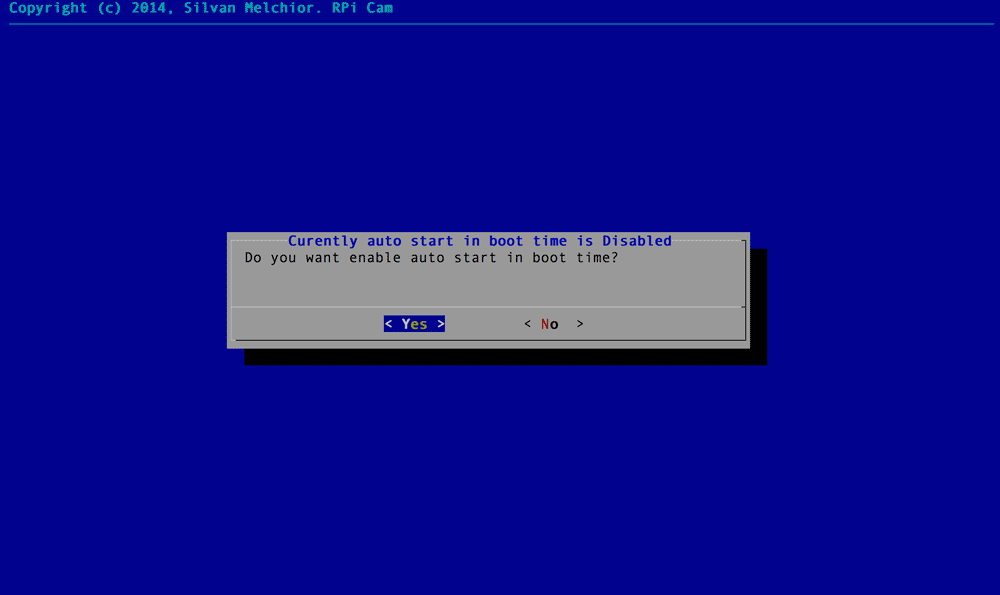
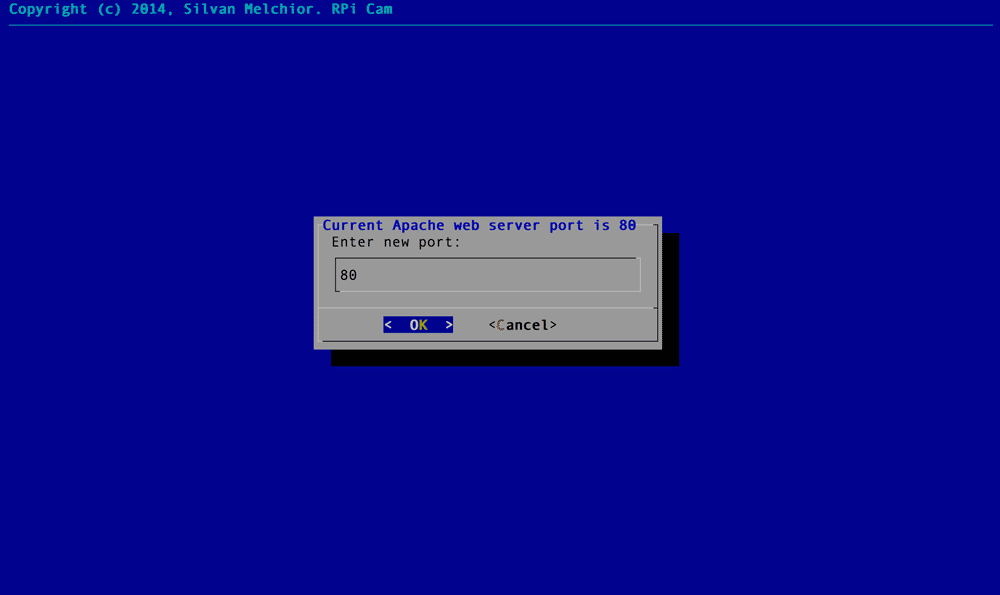
The installation program will then ask what port you’d like it to run on. I kept it at the default of port 80.
You will then be prompted for whether you’d like web server security. This will create a htaccess username and password for your server. I said no for testing purposes and because I’ve got it in a subfolder. In this demo, we’ll be creating other functionality in other subfolders, so I’d recommend putting security on your whole server at the root level if you’re worried about people spying on your Pi’s server!

The program will ask if you want to reboot the system, type in y and let your Pi set itself back up. When it turns back on, the light on your camera should come on to show that it is now watching its surroundings.
To see what your camera is seeing, you can visit the pre-built camera interface that the RPi Cam Web Interface provides. To do this, you’ll first need to know your Pi’s IP address. Not sure how? To do so, you can type in:
ifconfigIt’ll be one of the few actual IP addresses with that listing. Depending on the settings of your local network, it should be something relatively simple like 192.168.0.3. For me, it was 192.168.0.12 as my network has a bunch of other devices on it.
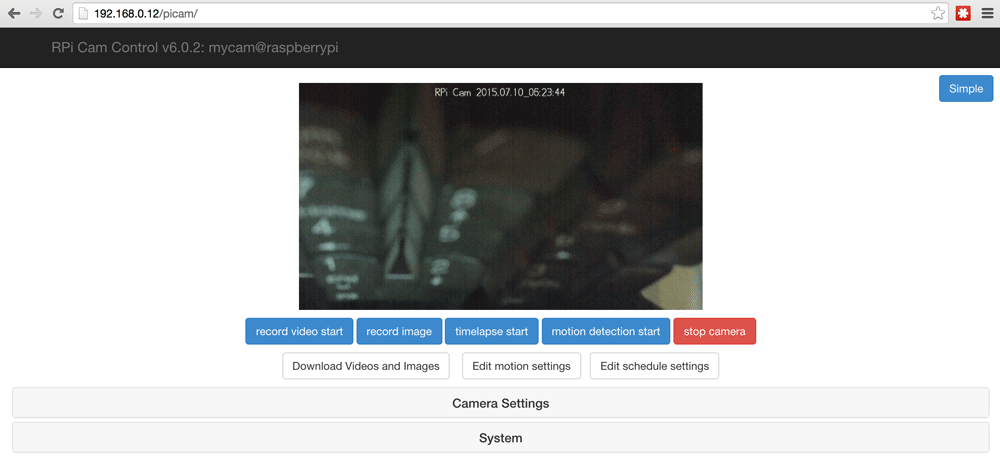
Open up a web browser on a computer that is on the same local network and type in your Pi’s IP address, followed by the folder name you installed the Pi camera web stuff into (e.g. http://192.168.0.12/picam). It should open up a web view of your camera! Here’s a view showing the unbelievably dull sight of my keyboard:
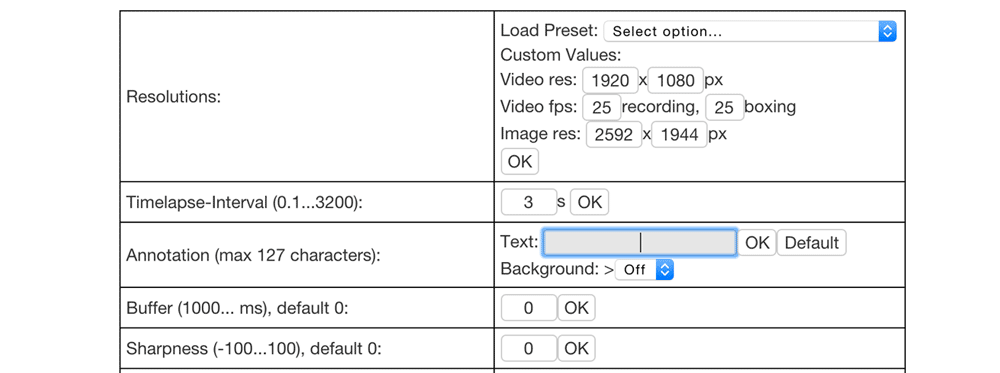
If you’d like to remove the text with the date and time at the top, open up “Camera Settings” and remove the text within “Annotation”:
Accessing Camera Images Via JavaScript
Whilst this interface alone can do a lot of very neat things including remote image capture, video recording, motion detection and so on, as a developer who likes to tinker and build my own things – I wanted to plug these images into my own creations. In particular, I wanted to try pulling it into the Google Cardboard VR/AR set up I created in my earlier article on Filtering Reality with JavaScript and Google Cardboard. This way, we can put on our Google Cardboard headset and watch our camera from a distance. Attach your Raspberry Pi to your household pet, a remote control car, keep it next to a fish tank or hamster enclosure, then enjoy a realtime VR experience sitting back and watching things from a new perspective!
To access images from the camera remotely from JavaScript, we’ll need this URL structure (substituting the IP address and folder for those you’ve got in your environment):
"http://192.168.0.12/picam/cam_pic.php?time=" + new Date().getTime()We ensure we’re getting the latest image by appending the current timestamp via new Date().getTime().
In order to access these images in JavaScript and the HTML5 canvas without encountering Cross-Origin Resource Sharing errors, we’ll be running this JavaScript on our Pi as well. It keeps things nice and simple. If you are looking to access the images from a different server, read up on Cross-Origin Resource Sharing and the same-origin policy.
We won’t cover all of the VR and Three.js theory in this article, so have a read of my previous articles on Filtering Reality with JavaScript and Google Cardboard and Bringing VR to the Web with Google Cardboard and Three.js for more info if you’re new to these.
The bits that have changed from my Filtering Reality with JavaScript and Google Cardboard article are that all the bits involved in the actual filtering process have been removed. You could very well keep them in there and filter your Pi camera images too! However, to keep our example simple and the code relatively clean, I’ve removed those.
In our init() function I’ve adjusted the canvas width and height to match the default incoming size that the RPi Cam software provides:
canvas.width = 512;
  canvas.height = 288;
However, when it does run the nextPowerOf2() function to ensure that it works nicest as a Three.js texture, it will end up as a canvas of 512×512 (just with black on the top and bottom from my experience).
I resize our PlaneGeometry to be 512×512 too:
var cameraPlane = new THREE.PlaneGeometry(512, 512);I also move the camera a bit closer to our plane to ensure it covers the view:
cameraMesh.position.z = -200;The animate() function is quite different, as we no longer are looking at the device’s camera but instead are pulling in the image from a HTTP request to our Pi camera on each animation frame. The function looks like so:
function animate() {
    if (context) {
      var piImage = new Image();

      piImage.onload = function() {
        console.log('Drawing image');
        context.drawImage(piImage, 0, 0, canvas.width, canvas.height);

        texture.needsUpdate = true;
      }

      piImage.src = "http://192.168.0.12/picam/cam_pic.php?time=" + new Date().getTime();
    }

    requestAnimationFrame(animate);

    update();
    render();
  }
We store our Pi’s camera image within a variable called piImage. We set its src to the URL we mentioned earlier. When our browser has loaded the image, it fires the piImage.onload() function which draws that image onto our web page’s canvas element and then tells our Three.js texture that it needs to be updated. Our Three.js PlaneGeometry texture will then update to the image from our Pi camera.
Adding To Our Server
There are a variety of ways to get this onto our Pi’s server. By default if you’ve just set up your Pi and its Apache server, the /var/www folder won’t allow you to copy files into it as you don’t own the folder. To be able to make changes to the folder, you’ll need to either use the sudo command or change the owner of the folder and files using:
sudo chown -R pi wwwYou could then FTP into your Pi as the default “pi” user and copy the files into the directory or add your project into a remote Git repo and clone it into the folder (I did the second option and thus could do it just via sudo git clone https://mygitrepo without needing to change the owner of the folder or files).
I added them into a folder called piviewer within the /var/www folder.
In Action
If we add this code onto our server and then go to our server from a mobile Chrome browser with our Pi’s IP address and the folder name of our custom code (e.g. mine was http://192.168.0.12/piviewer) you should see a VR set up that you can view within Google Cardboard!
Conclusion
We now have a virtual reality view of our Raspberry Pi camera, ready for attaching that Pi absolutely anywhere we desire! While Virtual Reality is a fun option for the camera data, you could pull it into any number of JavaScript or web applications too. So many possibilities, so little time! I’ve got my own plans for some additions to this set up that will be covered in a future article if they work out.
If you try out this code and make something interesting with it, leave a note in the comments or get in touch with me on Twitter (@thatpatrickguy), I’d love to have a look!
Frequently Asked Questions (FAQs) about Streaming a Raspberry Pi Camera into VR with JavaScript
How Can I Stream a Raspberry Pi Camera into VR with JavaScript?
Streaming a Raspberry Pi camera into VR with JavaScript involves a few steps. First, you need to set up your Raspberry Pi camera and ensure it’s working correctly. Then, you need to install Node.js and npm on your Raspberry Pi. Once these are installed, you can use the ‘raspivid’ command to capture video from the camera and stream it to a local web server. You can then use JavaScript and WebVR to display the video stream in a VR headset.
What are the Requirements for Streaming a Raspberry Pi Camera into VR?
To stream a Raspberry Pi camera into VR, you need a Raspberry Pi with a camera module, a VR headset, and a computer with a modern web browser that supports WebVR. You also need to install Node.js and npm on your Raspberry Pi.
Can I Use Any VR Headset to Stream a Raspberry Pi Camera?
Yes, you can use any VR headset that supports WebVR. This includes popular headsets like the Oculus Rift, HTC Vive, and Google Cardboard. However, the quality of the video stream may vary depending on the capabilities of the headset.
How Can I Improve the Quality of the Video Stream?
The quality of the video stream can be improved by adjusting the settings of the ‘raspivid’ command. You can increase the bitrate, adjust the frame rate, and change the video resolution. However, keep in mind that higher settings will require more processing power and bandwidth.
Can I Stream a Raspberry Pi Camera to Multiple VR Headsets at the Same Time?
Yes, you can stream a Raspberry Pi camera to multiple VR headsets at the same time. However, this will require more bandwidth and processing power. You may need to adjust the video settings to ensure a smooth stream.
Is it Possible to Stream a Raspberry Pi Camera Over the Internet?
Yes, it is possible to stream a Raspberry Pi camera over the internet. However, this requires a stable and fast internet connection. You also need to set up port forwarding on your router to allow external devices to access the video stream.
Can I Use JavaScript to Control the Raspberry Pi Camera?
Yes, you can use JavaScript to control the Raspberry Pi camera. You can use the ‘raspivid’ command to start and stop the video stream, adjust the video settings, and capture still images.
What is WebVR and How Does it Work?
WebVR is a JavaScript API that allows web applications to interact with VR devices. It provides a set of functions and objects that you can use to create VR experiences in your web browser. With WebVR, you can display 3D scenes, handle user input, and manage VR sessions.
What are the Limitations of Streaming a Raspberry Pi Camera into VR?
Streaming a Raspberry Pi camera into VR has a few limitations. The video quality may not be as high as with dedicated VR cameras, and there may be some latency in the video stream. Also, the Raspberry Pi has limited processing power, so you may need to adjust the video settings to ensure a smooth stream.
Can I Use Other Programming Languages to Stream a Raspberry Pi Camera into VR?
Yes, you can use other programming languages to stream a Raspberry Pi camera into VR. However, JavaScript is a popular choice because it is widely supported, easy to learn, and has a large community of developers. Other options include Python and C++.
 Patrick Catanzariti
PatCat is the founder of Dev Diner, a site that explores developing for emerging tech such as virtual and augmented reality, the Internet of Things, artificial intelligence and wearables. He is a SitePoint contributing editor for emerging tech, an instructor at SitePoint Premium and O'Reilly, a Meta Pioneer and freelance developer who loves every opportunity to tinker with something new in a tech demo.

