Preparing a Local Development Environment
Before you start writing your first WordPress plugin, it is important to have a good set of tools in place that will allow you to work locally on your computer and be more efficient in your work. While it is possible to perform some development tasks with the built-in tools that are provided with the operating system, creating a solid local development environment will help you develop plugins quickly and have full control over your server settings to be able to test different configurations.
This chapter proposes a set of free tools that can easily be installed on your computer, regardless of your preferred operating system, to facilitate the development of your future WordPress plugins. These tools include a local web server to speed up page access and avoid sending files constantly to a remote server, a version control system to keep incremental backups of your work, and a code editor to enhance your editing capabilities.
We will cover the following recipes in this chapter:
- Installing a local web server on your computer
- Creating a local version control repository
- Installing a dedicated code editor/text editor
Technical requirements
You can find complete code examples on GitHub under the following repository: https://github.com/PacktPublishing/WordPress-Plugin-Development-Cookbook-Third-Edition.
Installing a local web server on your computer
The first step to preparing a local development environment is to install a local web server on your computer. This will transform your computer into a system capable of running the core WordPress code and performing all tasks related to rendering a WordPress website locally.
Having a local web server has many benefits:
- It provides a quick response to the frequent page refreshes that are made as plugin code is written, tested, and refined, since all information is processed locally.
- It removes the need to constantly upload new plugin file versions to a remote web server to validate code changes.
- It allows development to take place when no internet connection is available (for example, when traveling on an airplane). This is only possible if your plugin code does not interact with external servers.
- It offers a worry-free programming environment where you cannot bring down a live website with a programming error or an infinite loop.
There are many free packages available online that contain all of the web server components necessary to run a WordPress installation.
How to do it…
Follow these steps to easily install the aptly named Local application from Flywheel:
- Visit the Local website (https://www.localwp.com/) and download the appropriate package for your computer.
Note
Local is free and available for Windows, macOS, and Linux platforms. The screenshots and instructions in this recipe are based on Local version 6.1.5 running on Windows 11. The installation steps and exact dialog content may vary based on your choice of platform.
- Launch the Local installer.
- On Windows, select whether the application should be available only to the user performing the application or to all users (requires administrator privileges), and then leave all the other options at their default values.
- Also on Windows, make sure that the Run Local checkbox is checked at the end of the installation process and click on Finish to exit the installer and start Local.
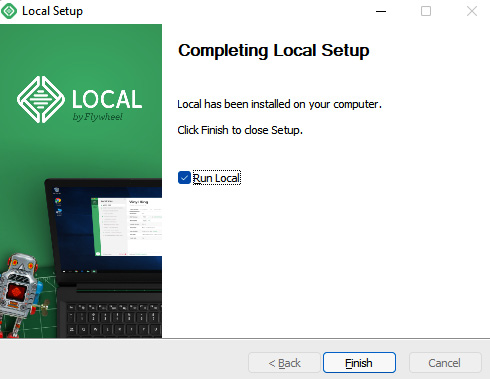
Figure 1.1 – Last page of the Local installation program on Windows
- On macOS, open the installation package and drag the Local program to the Applications folder. Once this is done, search for Local and run it.
- When Local first starts, you will need to accept the application's Terms of Service and will also be given the option to activate Error Reporting to automatically report problems back to the Local team. You can activate the error reporting feature at your discretion.
- On the next screen, you will be prompted to create a free Local account. This is optional and can be bypassed by closing the account creation screen, bringing you to the main Local interface.
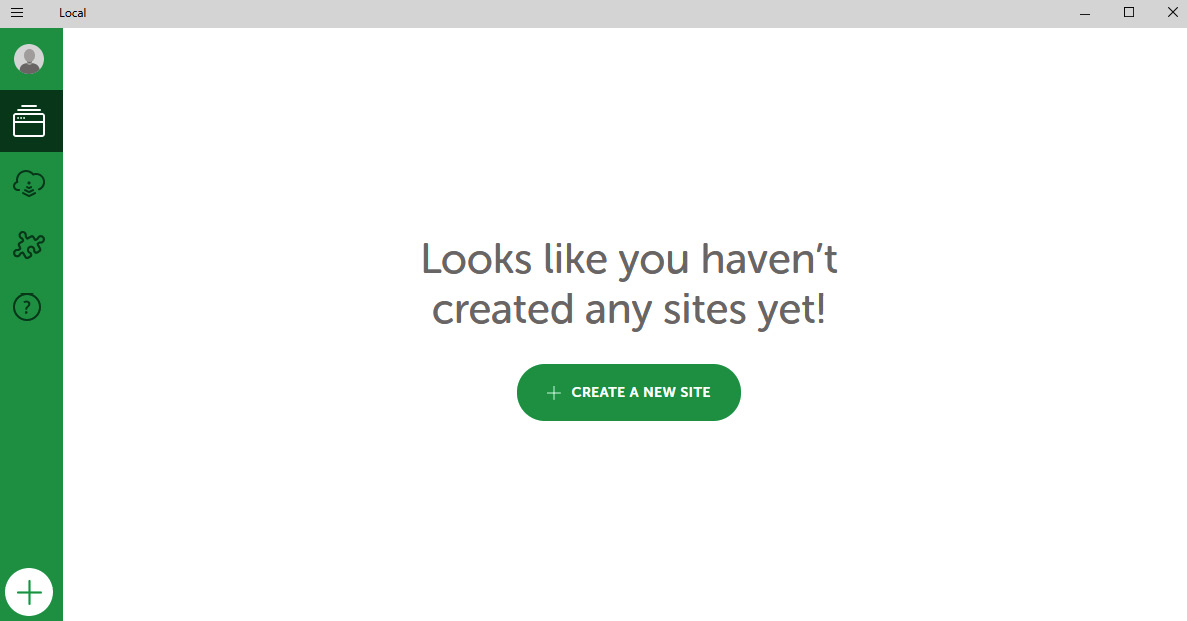
Figure 1.2 – Main Local interface
- Click on + CREATE A NEW SITE to start the site creation process.
- Name your new site Plugin Development Site and click on CONTINUE.
- Select the Preferred option to create a site running the latest versions of PHP and MySQL, along with the nginx web server, and then click on CONTINUE.
- Specify a username, password, and email to create an account on your development WordPress site and then click on ADD SITE. The Local application will download and install the required components and start all of the required applications to have a working local WordPress installation. On Windows, you may need to allow multiple applications through the computer's firewall.
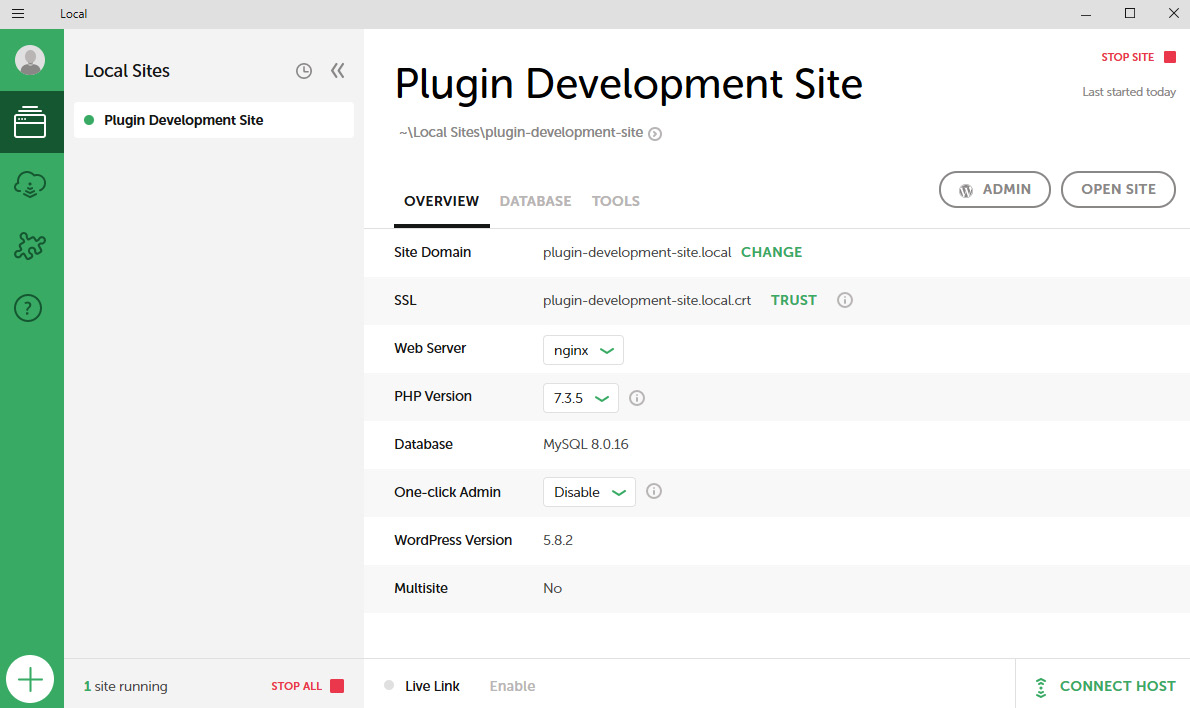
Figure 1.3 – Newly created local development site
- Visit your local development site by clicking on the OPEN SITE button in the top-right corner of the Local interface. The default address of your site is http://plugin-development-site.local/.
- Back in the Local interface, click on the ADMIN button to visit your site's login page and connect using the credentials you provided during the site creation process.
- Make sure that the active theme is Twenty Twenty-Two. If not, install it and activate it.
- Still in the Local interface, click on the arrow next to the site path under the site name to access the site's local files on your computer. The WordPress software files will be found under the app\public directory within the site directory.
How it works…
The Local application contains all of the components necessary to run a web server capable of hosting a WordPress website on your computer. These components include:
- nginx or the Apache web server
- PHP interpreter
- MySQL database server
- Adminer database management interface
Once we've created a development site with Local, the application registers a website domain that is recognized by the operating system as a request to communicate with the locally hosted development website. In this example, the domain created is http://plugin-development-site.local. When developing a local site that will eventually be deployed online, you can change the Site Domain field in the Local interface to match the domain of your target website. This allows you to work on the site locally while accessing it as if it was in its final online location.
There's more…
While Local is a full-featured local web server package and is available on the three major operating systems, there are many others available online. Most of these packages will run the required web services on the computer directly, while more advanced packages, such as Varying Vagrant Vagrants (VVV), will virtualize a complete Linux-based web server on your computer to create a more accurate replica of a final deployment environment optimized for WordPress. Here is a list of some of the most popular local web server packages:
For Windows:
- WampServer (https://www.wampserver.com/en/)
- EasyPHP (https://www.easyphp.org/)
For macOS:
- MAMP (https://www.mamp.info/en)
Cross-platform:
- Varying Vagrant Vagrants (https://varyingvagrantvagrants.org)
Tip
For a more complete list of web server packages, visit https://en.wikipedia.org/wiki/List_of_AMP_packages.
Creating a remote web development environment
If it's not possible for you to set up a local web server to develop WordPress plugins, or if you are planning to share the development tasks with one or more developers, then an alternative to setting up a local web server is to create a remote development environment.
The easiest way to create such an environment, assuming that you already have a web hosting account set up, is to create a sub-domain off your main domain. This will allow you to create a standalone test installation for WordPress that will still provide safety from the point of view of affecting a live site but will not carry the other benefits of a local installation.
Creating a local version control repository
Version control is an important part of any code development project. Version control keeps track of a project's history, provides full and organized backups, and easily rolls back changes in order to get back to a known working state. Version control is also the best and most efficient way to share code and other files when developing a project in a team environment. In addition to being a great version control system that is easy to use and configure, Subversion (often referred to as SVN) is also the technology that manages all submissions on the official WordPress plugin directory. Therefore, by setting up and using a local Subversion repository during your initial plugin development, you will immediately be ready to share your creations with the community. We'll be covering the most commonly used Subversion commands in this recipe.
How to do it…
Follow these steps to create a local Subversion version control repository:
- On Windows, visit the TortoiseSVN website (https://tortoisesvn.net/downloads.html) to download and install the free Subversion client for your version of Windows (32-bit or 64-bit).
- On macOS, you can download and install the Subversion binaries from Wandisco (https://www.wandisco.com/source-code-management/subversion#osx) or use Homebrew (https://brew.sh/) to easily add them to your computer.
Tip
While there are tools that offer a graphical user interface for Subversion, this recipe focuses on the creation of a local repository using Subversion's command-line tools to be more platform-agnostic.
- Create a new folder on your hard drive that will host your local Subversion repository (for example, c:\WPSVN).
- Open a Command Prompt or Terminal and navigate to the newly created directory.
- Use the following command to create the required file structure in the target directory:
svnadmin create c:\WPSVN
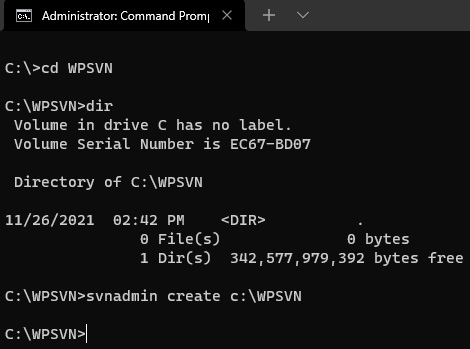
Figure 1.4 – Creating a local Subversion repository with command-line tools
- Use the cd command to navigate to the wp-content/plugins directory of your local WordPress installation, making sure to use double quotes around the path if it contains any spaces. For example, if you are using the Local software for your development site on a Windows computer, the command would be as follows, with ylefe replaced with your own user directory name:
cd "C:\Users\ylefe\Local Sites\plugin-development-site\app\public\wp-content\plugins" - Use the following command to import all files from the WordPress plugin folder into your local Subversion repository:
svn import -m "First import of complete WordPress plugin directory to repo." file:///c:/WPSVN - Enter the following command to check out all the files from the repository and force the local files to be overwritten:
svn checkout --force file:///c:/WPSVN .
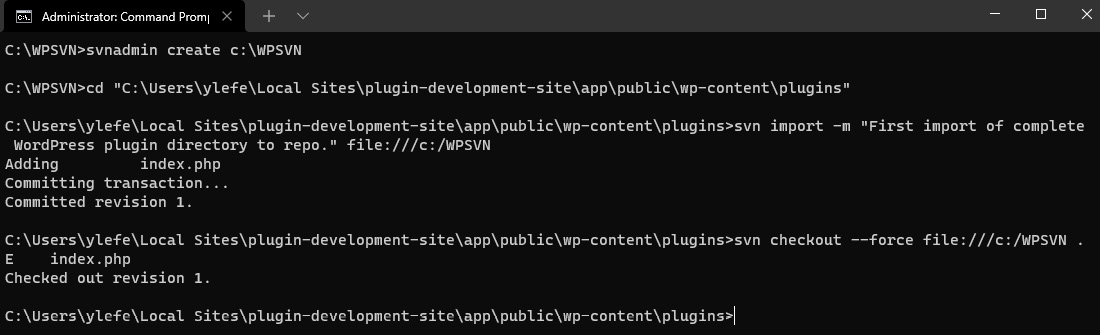
Figure 1.5 – Importing and checking out all WordPress plugin files
- Open the index.php file from your WordPress plugin directory in a text editor.
- Edit the comment on line 2 to change it from Silence is golden to Silence is everything, and then save and close the file.
- Create a new folder in the plugins directory named chapter1 using your computer's File Explorer/Finder or the directory creation command:
mkdir chapter1 - Enter the following command from the Command Prompt or Terminal to add the new directory to the repository:
svn add chapter1 - Navigate to the chapter1 directory using your computer's File Explorer or Finder and create a new text document named example.txt.
- Back in the Command Prompt or Terminal, use the following command to see the version control of the files contained in the plugin directory:
svn status
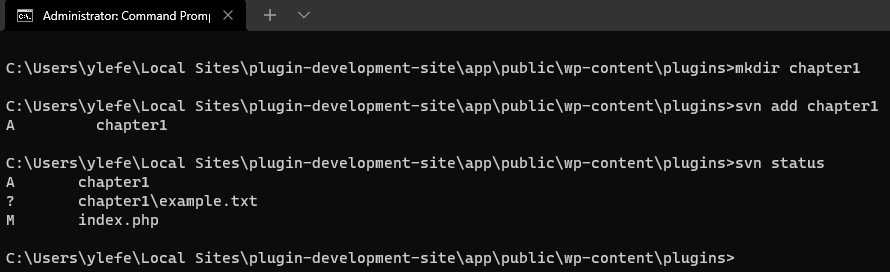
Figure 1.6 – Version control status for all files in the plugin directory
Note
As we can see from the output of the svn status command, the Subversion software correctly identified that the index.php file was modified (indicated by the letter M) and that the chapter1 folder is to be added to the repository (indicated by the letter A). However, it is unsure what to do with the example.txt file since we did not identify it with an svn command (indicated by a question mark). If we were to commit our changes to the repository at this time, the example.txt file would not be sent with the other changes.
- Set the example.txt file to be added to the repository with the following command:
svn add chapter1\example.txt - Commit all changes to the local repository with the following command:
svn commit -m "Modified index.php, created a new directory and added a file in new directory"
The following figure shows the execution of the svn commit command and its output.
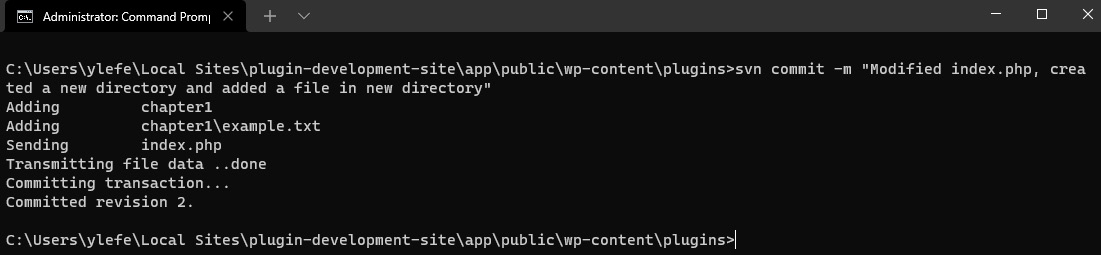
Figure 1.7 – Sending updates to the local Subversion repository
- Delete the chapter1\example.txt file using your computer's File Explorer / Finder or with the appropriate command-line tool for your operating system (del on Windows and rm on macOS/Linux).
- Back in the Command Prompt or Terminal, run the svn status command to see that Subversion identifies the missing file with an exclamation mark.
- Use the following command to mark the file for deletion when the next commit command is executed:
svn delete chapter1\example.txt - Use the following command to delete the chapter1 directory and mark it for deletion in a single step:
svn delete chapter1
How it works…
Subversion is a free, open source version control system that is designed to keep file revisions organized and backed up over the course of a project's development, as well as provide access to older versions of all files at any time. If you have ever found yourself copying a directory on your computer and giving each copy sequentially numbered names, then you've already used a primitive version control system. Subversion and other version control tools are really just a more organized and efficient method of achieving the same goal of keeping backups of code files and being able to access any old version of a file.
While the default Subversion interface is a set of command-line utilities, TortoiseSVN and many other client applications provide graphical tools to create, access, and manage local and remote repositories.
In addition to familiarizing yourself with this system for later use on wordpress.org, using a local Subversion repository ensures that you always have easy access to older versions of your plugin files. This can be very useful in case a code change breaks your work and you cannot figure out how to get back to a working state.
Using the import Subversion command copies all the selected files to the repository. In addition to storing the files themselves, Subversion identifies each file with a revision number and an optional import message. The revision number is generated by Subversion and incremented every time a group of files is added. It is especially useful when searching through a repository's history.
Performing a checkout operation takes copies of all files from the repository and places them in the target directory. It also creates a .svn sub-directory that contains information on the address of the source repository, along with original versions of all the files that were checked out. These original files are used by Subversion to determine when changes have been made to any file relative to its contents when they were last committed, checked out, or updated. It might seem a bit redundant to have an original copy of all the files in the .svn folder when our repository is locally hosted. However, this is the same functionality that allows Subversion to identify file changes when working on a remote repository, even when your computer is not connected to the internet.
When the commit operation is performed, new files are added to the repository, modified files are uploaded and stored next to their previous versions, while deleted files are tagged as no longer being part of the current project version. While some of these behaviors might seem strange, it's by preserving previous versions of files and even keeping files that are no longer part of a project that Subversion is able to let us navigate through a project's entire history or bring back past versions of files.
There's more…
Using a Subversion client with a graphical user interface can greatly facilitate some of these tasks. For example, the version control status of files can be seen overlaid on top of the file and folder icons right in Windows File Explorer when TortoiseSVN (https://tortoisesvn.net/) is installed.
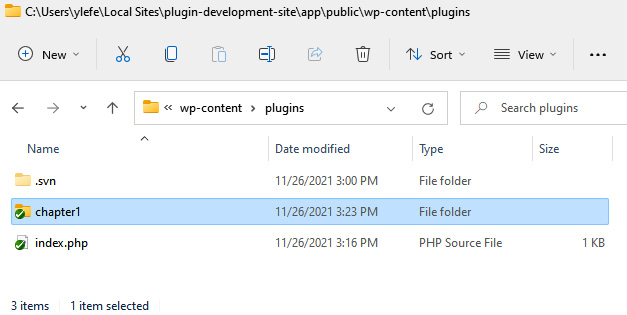
Figure 1.8 – TortoiseSVN integration in Windows File Explorer
GUI-based Subversion clients also include interactive menus for all of the commands covered in this chapter, but the actual steps to use them vary greatly from one client to the next. You should look for these graphical administration capabilities when searching for a Subversion client. For example, SmartSVN (https://smartsvn.com) offers free and paid versions of its client for Windows, macOS, and Linux, while Versions (https://versionsapp.com/) and Cornerstone (https://cornerstone.assembla.com/) are two popular paid applications on macOS.
Other version control systems
While Subversion is easy to learn and is the system that is used by WordPress on its official plugin repository, other version control systems, such as Git (https://git-scm.com/) and Mercurial (https://mercurial-scm.org/), are very popular in the open source development community and could also be considered to manage your plugin code. It's even possible to use a combination of version control systems with your code base. For example, you could use Subversion to commit to the official WordPress repository, but also use Git to commit the same code to a popular platform such as GitHub (https://github.com/), which makes it easy for your users to submit pull requests.
Viewing the differences in modified files
By using the svn diff <filename> command on any modified file, Subversion will bring up its built-in file difference viewer tool, highlighting the parts that are different between the last version of the file in the repository and the current version of this file. This allows users to see what changed at a glance and be sure that no code was modified inadvertently. It's also possible to display the results using a graphical diff tool, as long as the application command is in your system path, as shown in the following example:
svn diff index.php –-diff-cmd winmergeUpdating files to the latest repository version
If you are the only person committing files to a repository and you are working on a single computer, then you will never need to use the svn update command. This function is designed to compare your local files with the repository and check whether new files or new revisions are available in the repository that are not present locally. It will then apply all the necessary changes to the local versions of these files. Remember to use the svn update command regularly if you are working in a team environment or are developing a project across multiple computers.
Reverting uncommitted file changes
Until a file is committed to a repository, it's possible to reverse all the changes made to it since the last checkout, update, or committal by using the svn revert <filename> command. This can be useful if you made changes to the code that broke its functionality and want to get back to a known good state.
Viewing file history
As multiple versions of files are committed to a repository over time, Subversion keeps track of all the versions of these files along with the messages that were associated with each commit operation. The svn log <filename> command allows you to see a full history of changes made to one or more files.
Installing a dedicated code editor/text editor
Most operating systems provide a built-in text editor. While it is possible to create WordPress plugins using such a simple tool, it is highly recommended to install a dedicated code editor on your computer to simplify your plugin development work.
Getting ready
Of course, not all code editors are equal. Here are some of the features that you should look for when selecting a code editing application:
- PHP syntax highlighting
- Completion of PHP function names
- Ability to search across multiple files
- Ability to highlight all instances of search keyword(s) or selected text
- Line numbering
- Ability to resize the editor text or specify a replacement font
- Possibility of opening multiple files simultaneously
The following editors contain most or all of these key features. Most are free tools, but some are paid applications.
Cross-platform:
- Visual Studio Code (https://code.visualstudio.com)
- Sublime Text (https://www.sublimetext.com)
On Windows:
- Notepad++ (https://notepad-plus-plus.org/)
On macOS:
- TextMate (https://macromates.com)
On Linux:
- Screem (http://www.screem.org/)
How to do it…
Follow these steps to install Visual Studio Code and learn about some of its core functions:
- Visit the Vortex Studio Code site (https://code.visualstudio.com) and download the installation package for your platform of choice.
- Run the installation program for the editor and select the default settings.
- Launch the code editor.
- Connect to the administration section of your WordPress development site and click on the Plugins menu item.
- Check whether you have the Hello Dolly plugin from Matt Mullenweg installed. If not, go to the Add New section, search for it, and then click on Install Now.
- Back in the code editor, open the hello.php file from the plugins or plugins/hello-dolly directory of your local WordPress installation. You will see that different parts of the code are displayed in different colors based on the type of code.
- Double-click on a word to select it (for example, Hello). You will see any other instance of that same word highlighted across the file contents.
- Scroll down and hover your mouse cursor over the standard explode PHP function to see its definition and list of arguments.
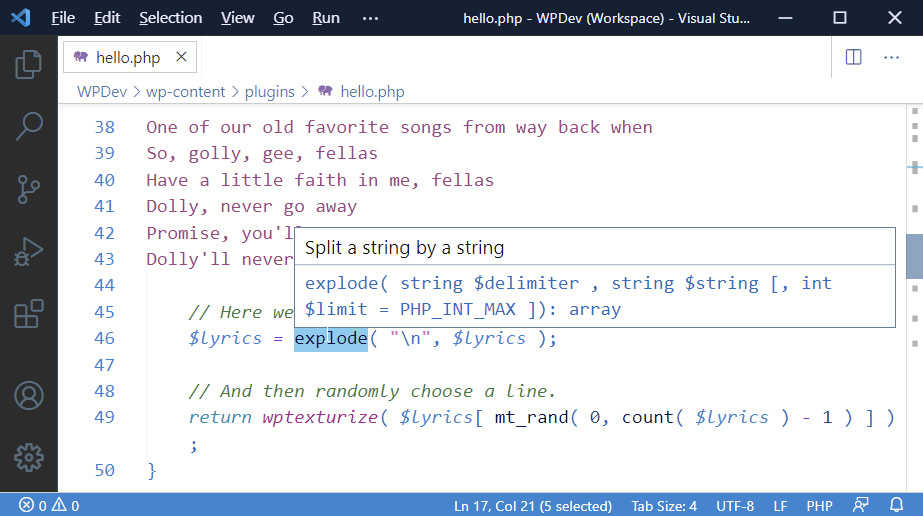
Figure 1.9 – Visual Studio Code interface with PHP function data
How it works…
Code editors have built-in parsers that enable them to identify the parts of the code that are comments, PHP language functions, text strings, and a variety of other elements. Having these elements colored on the screen makes it much easier to read through code and to see that a function's name is not spelled correctly, or to quickly identify comments.
Another functionality that is crucial when developing plugins for WordPress is the ability to see line numbers in the editor. This function comes in handy, especially when PHP code errors come up, since the filename and line of code that was being processed at the time of the error are normally displayed. In most code editors, the developer can either scroll to the specific line or enter the line number in a quick Go To dialog box (Ctrl+G in Visual Studio Code) to jump to that line right away.
There's more…
Just like WordPress, Visual Studio Code has a rich plugin environment that allows its users to transform it into a complete development environment. The following extensions, all freely available from the built-in Marketplace, are highly recommended when developing WordPress plugins:
- PHP Extension Pack by Felix Becker: Includes the PHP Debug extension to connect Visual Studio Code to an XDEBUG-enabled web server and be able to step through every line of code and set breakpoints to facilitate debugging. Also contains the PHP IntelliSense extension to augment the editor's autocompletion capabilities.
- SVN by Chris Johnson: Integrates Subversion version control functionality in the editor. As you modify the code, you'll be able to see modified lines in the editor margins. This extension will also identify all modified files and allow you to perform all interactions with your version control server right from the editor.
- WordPress Hooks Intellisense by John Billion: Adds the completion of WordPress API functions as you write your plugin code.